
The warmer weather has me wanting to work on all sorts of outdoor projects lately. I've been sprucing up the outside of the house and decided I needed new planters for in front of the garage. The other planters were small and light weight and every time we had wind, they would blow over. After two years of sweeping up dirt and re-potting the poor bushes several times a month, it was time for planters that were more substantial. These DIY outdoor planters were easy to make and look great!
This post is sponsored by HomeRight but all ideas and opinions are 100% my own. Some links within this post are affiliate.

I have an embarrassingly large amount of scrap wood in my garage. It takes up more room than I'd like to admit. So for this project, I decoded to use as much of it as I could.
I used up some of my plywood scraps for the center of each panel, 1x4s for the frames, 2x4s for the bottom, and 2x2s for the feet.
The 1x4s I had on hand were the furring strips and not the nice kiln dried sanded ones. I made it work by filling knot holes and sanding but if you are buying supplies you may want to buy the nicer boards. Cedar would be a good choice too.

For being made of scrap wood, I think they look pretty good!

DIY Outdoor Planters
Start out by cutting your 1x4 boards with 45 degree cuts on the ends. I wanted my panels for each side to be 15" x 20".

I drilled pocket holes using my Kreg jig and screwed them all together. Make sure to drill the pocket holes on the least pretty side so the nicest side will be the front.

Once the frames were all made and sanded well, I nailed the pieces of plywood onto the back side of each frame to create the panels.
Since brad nails don't hold up well over time on outdoor projects alone, I caulked around each panel (front and back) with paintable caulk. The clear paintable caulk is easier to work with in my opinion. It goes on smoother and shrinks a little so when it dries it hardly looks like there is any caulk there at all.

Once all the panels are made, I nailed them together to form a box. I decided for this project that I would just butt them up against each other since it didn't matter if it was 100% square. But in the past, I have also used the table saw to cut each side at a 45 degree angle. You can see an example of that with my X planter box in my book.
Just like with the panels, I used caulk to "glue" and seal the panels in addition to the nails.

Since the plants will just be set inside these planters and not directly planted in them, I made the bottom have large slats so water can easily drain and not collect in the bottom.
I screwed these into place and puttied over the screw holes. I inset them a bit so the feet could be braced in the corner a bit.

After all that work, it was time to PAINT! I used the HomeRight turn table for this project.

Because I did this in on the grass, I put a scrap board under it and because the planter was bigger than the turn table, I added another one to the top. It made it so easy to paint! You can see how fast and easy it was in a video on my DIY instagram stories.

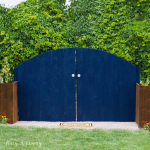
I chose the same navy color as my window boxes and front porch planters. It always startles me when it goes on bare wood because it seems so bright. I chant in my head "It darkens as it dries" so I don't second guess my paint color.
After spraying on the first coat with my Finish Max Super, I lightly sanded it again. The paint raises the grain and makes it feel rough. Doing a quick sand will make it super smooth and allow the second coat to go on perfectly.

I added a couple of leftover pavers in the bottom the help raise up the pots the bushes are in and to give it even more weight. Hopefully these planters don't blow over!

Have you ever made planters? What kind of outdoor projects do you have planned this year? Let me know in the comments!
PIN For Later:


These look simple to make. The lazy Susan and board is genius!
These are really striking and actually a pretty easy do...for a home DIYer. Love the color and scale, I think we will adapt your design for some boxes we need to build, Sandi from OTMOON
I love how these look! I was just admiring similar looking ones that my neighbor has and this is a great tutorial on how to make some. I would love to have you join my Centerpiece Wednesday Linky party and share this post with us! https://karinskottage.com/2020/07/welcome-to-centerpiece-wednesday-july-8.html Hope to see you there!
Karin
Love these and the color, Great job. Just found your blog on the Pin Junkie link up.
I love the idea of slats and using pots to avoid loading them full of dirt. They look great!
You made this project look so easy and your color choice is beautiful. I definitely pinned this one. Thanks for sharing this week at #HomeMattersParty
These planters are really great. I love the blue colour as well. I like the way your built the base with the slat. Pinned
Your planters turned out perfect!
Have a beautiful week,
Kippi