
It has been a couple of years since I shared this project. This is the perfect time of year to start a project like this so I am sharing it again. I only made 4 last time so I think I am going to build some more DIY outdoor chairs this summer. We are lucky enough to have a nice fire pit in the backyard. Having four boys who love all things outdoors, we use it all the time. Up until now, we have lugged out the dining room chairs every time we use the fire pit. I finally broke down and decided that building some chairs needed to be pushed to the top of my to-do list. Here is how I made these super easy DIY outdoor chairs!


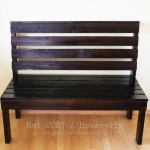
A long time ago I built a bench for Shane’s brother and his wife for their new home. I liked the design I came up with so much that I decided to use it for these chairs. I liked that the bench was deep enough that adding a pillow didn’t make you feel like you were sitting on the edge of the seat. And since it’s made from 1x4s and 2x4s, it’s very sturdy and won’t blow away every time it gets a little windy.
Cut list per chair:
(11) 18” 1x4s – slats for seat and back
(2) 22” 2x4s – front and back connector
(2) 38” 2x4s – back legs and back
(2) 17” 2x4s – front legs
(2) 15” 2x4s – finishes off sides
(1) 18” 1x3 – caps off top of chair for a finished look
(1) 15” 1x3 – added to back of chair
DIY Outdoor Chairs - Assembly
Step 1:
I started by cutting two pieces of 2x4 to be 38 inches high and two pieces to be 17 inches high. The 38-inch boards will be the back and the 17-inch-high boards will be the front legs. Then I cut two 22-inch boards. These will connect the front and the back and determine how deep your chair is. If you don’t plan on having pillows and want it a bit shallower, 18 inches would be a good depth too.

Step 2:
I wanted the back slightly slanted so it would be more comfortable. I measured and marked the center of the top of the back 2x4s, then used a straightedge to draw a line down to the bottom where the seat will be.

I used my jigsaw to cut along the line, then sanded it after cutting.

Step 3:
Now it’s time to attach all the 1x4 boards. I cut 11 boards to be 18 inches long, attached the front pieces first to the leg pieces as shown below, then added the back piece.

By adding the front and back pieces of the seat first, you can then fill in the center and make sure the gaps are all equal. I eyeballed it, although the measurement will be about ½ inch.
Step 4:
Once the seat boards are attached with wood screws, you can start the back. I started with the lowest one. Instead of having it flush against the seat board, I made a ½ gap. I added the top back board next so I could then fill in the middle like the way I did the seat.

Step 5: (*optional)
Now that the chair is basically assembled, it’s time to add some boards that will give it a more finished look. Cut a 2x4 board to fit inside the legs and attach one to each side.

I added a 1x3 to the top and to the back of the seat like shown below.


DIY Outdoor Chairs - Finishing
The chair is completely assembled! It is really a pretty easy build. I built all four in one day.
Step 1:
Once the chair is done you will want to use a hand sander to remove any inked-on text from the wood, then hand sand the whole chair. 1x4s have a waxy feel and won’t absorb stain well unless you sand and open the pores. Wherever you used the hand sander, make sure to hand sand after really well or you will be able to see the circular marks made by the sander when you begin to stain. Start with a 100 grit then finish with a 150 or 220.

Step 2:
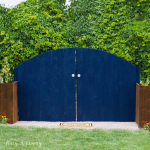
Dust the chair off and you are ready to stain! I used the same color that I used on my planter box fence last month. I loved the look of Thompson’s WaterSeal Penetrating Timber Oil Semi-Transparent in Walnut. The color is dark and rich, but still allows the wood grain to show through.

To apply the stain, I used a brush that is designed for use with oil-based paints and stains. Using a brush made it easy to stain the ½” gaps between the boards.
Allow the chairs enough time to dry before using them. The can recommends letting the stain dry for 24 hours to cure completely.

They fit around our firepit nicely!

Once they were dry, we were able to test them out. Someone who shall remain nameless (*cough cough Shane*) ate the marshmallows before we could roast them, but hot dogs for dinner is always a hit.

Do you have enough outdoor seating? What type of outdoor seating do you have?
PIN For Later:

You will also like:


Stacy you must make one for yourself.They really do look nice as well as comfortable. How very neat and professional they also look. you did a great job. I was wondering if you took advantage of having the lumber cut for you at the lumber store but i saw in your instructions that you even did that part.
Thank you! They really are super comfortable. The plan was to make 8 total (a couple extra for guests) but I thought 4 would be easier to start with since I had a deadline to meet. If I have a lot of lumber to buy, and I have a car instead of my van, I have the store make some cuts so they will fit in my car. It really is such a nice service!
I love these so much and want to make them into bar stools for the house that we are buying. Do you have any idea what the perfect height would be for the front/black legs? Thank you so much.
Thank you for sharing the tutorial! I was ust looking for an easy project for next weekend and this will be perfect. Thank you!
Wow...this is a keeper...I love these chairs and want to try my hand...your instructions are great...thanks! Hot Dogs grilled on a stick...Love that best of all! :)
Wow, very much so, nicely done
These came out so good. Perfect for the fire pit. The boys look happy.
Happy 4th
Cindy
These look amazing! You did a fine job. And the tutorial makes me believe even I can make one or possibly 4. Lol... Probably have to burn my first chair but by the fourth chair I would like to believe I could have the process mastered. Thanks for sharing. I'm saving this for when I get myself a new jigsaw. Nothing like having the right tool for the job to make everything go smoothly. Keep up the good work!
?~Allison
Great job! Thank you for sharing at Party In Your PJ's.
Great project! They turned out lovely!
Hello - this looks awesome. My question is what kind of wood did you use and how well has the wood handled being outside in the weather (albeit stained) in the years this was originally posted. Thank you.
I just used pine. I just had my son tighten the screws on two as they had become a tiny bit wiggly (my boys haul them all over the yard and use them to climb up into the trees and jump down on them). The stain is a bit faded so I am going to re-stain them this summer. But overall they have held up great. They get sprayed by the sprinklers and everything!