
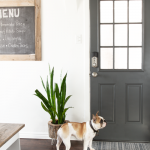
I have been working on several projects all at the same time like your typical ADD DIYer and I finally have one I can share! I installed new flooring!!! (Finally, right?) I have been putting it off for years because of the amount of work it is but finally buckled down at did it. I felt like we were moving. Boxes were packed, furniture was cleared out of the rooms. Such a pain! But I love how they turned out. We opted to also replace the baseboards. They were the original baseboards from 1938 and had who knows how many coats of paint on them. Every time they chipped, it would chip down the the wood and created a big dent. They were in bad shape. While I was at a conference in Atlanta, I met with a wonderful company called Woodgrain and they offered to supply me the baseboards needed for this project. Today I am revealing the new flooring and baseboards as well as sharing my tips on how to install baseboard.
I really loved the simplicity of the old baseboards and previously I had not found something I had liked as much. Woodgrain had a simple profile that was very similar to the original so I was thrilled. I chose the primed pine base so that painting would be so much easier.
Look how great it looks!
 #woodgrain #baseboards #howto #diy #tips #installbaseboard #baseboard #flooring #woodfloors #")
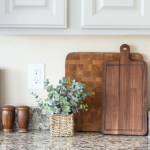
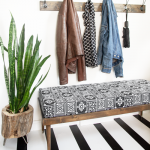
The entire upstairs got new flooring and new baseboards. If you remember, the old floors were actually just the subfloor that we stained when we moved in 12 years ago. To say they were hammered is an understatement. I was happy to cover them up!
 #woodgrain #baseboards #howto #diy #tips #installbaseboard #baseboard #flooring #woodfloors #livingroom #neutrals #farmhouse")
Before I share more reveal photos, I'd like to share my tips on how to remove and install baseboard. It's a big job and I hope this will make it a bit easier for you!
How to Install Baseboard
Step 1:
Before you grab a crowbar and go nuts on your baseboards while yelling "Demo day!", you need to do one step that will make your life easier and will minimize damage to your walls. Chances are your baseboards were caulked and painted (maybe even several times over) so you need to run a box cutter along the top to separate the baseboards from the wall.
Step 2:
If you have drywall, a paint scraper should work great to get behind the baseboard to pry it from the wall. Use a hammer to work it down and gently move the scraper back and forth.
 #woodgrain #baseboards #howto #diy #tips #installbaseboard #baseboard #flooring #woodfloors #demo")
I have lath and plaster interior walls and the exterior walls are cement and brick. Not only that, but the nails that were holding them in the wall, were a tad larger than your typical finish nail. I had to use the crowbar....carefully.
 #woodgrain #baseboards #howto #diy #tips #installbaseboard #baseboard #flooring #woodfloors")
Step 3:
Once all the baseboard was taken off, it was time to measure and cut the new baseboards. I bought a new saw blade because I wanted to make sure the cuts were nice and smooth. It is helpful, if possible, to have a helper for this step. One can measure while the other cuts. Shane was able to help a little over the weekend and it sped things up quite a bit.
If you have a room that is longer than the piece of base, cut at a 30 degree angle where to two boards will join. One will be cut one direction and the other board the opposite direction so they match up and create a seamless joint.
 #woodgrain #baseboards #howto #diy #tips #installbaseboard #baseboard #flooring #woodfloors #mitersaw")
Step 4:
It is time to nail! After all the prep work, it is quite satisfying to actually start installing the base. Make sure you push down on the base so it is flush against the flooring and there are not any gaps between the base and the flooring. Houses aren't square or perfectly level so you probably will still have some here and there, but pushing down as you nail will minimize it.
 #woodgrain #baseboards #howto #diy #tips #installbaseboard #baseboard #flooring #woodfloors")
Step 5:
Caulk is a DIYers best friend. It can hide a multitude of imperfections such as seams in baseboards. I caulk along the top as well as in the corners where two pieces join together. For nail holes and the 30 degree joints (like I mentioned above), I use wood putty that can be sanded. I never use caulk for nail holes. You need to be able to sand it smooth or you will be able to see where you filled them.
 #woodgrain #baseboards #howto #diy #tips #installbaseboard #baseboard #flooring #woodfloors")
Step 6:
The last step! It is time to paint. Well, actually, you need to tape first. My wall color and base color are the same so I didn't need to tape above but I definitely wanted to protect the new floors. You can see the wood putty along the 30 degree joint in this picture. Once painted, you'll never know it isn't all one long board!
 #woodgrain #baseboards #howto #diy #tips #installbaseboard #baseboard #flooring #woodfloors")
I have been shocked at how much of a difference new flooring and the (non-chipped) baseboards have made. I feel like I have a whole new house!
 #woodgrain #baseboards #howto #diy #tips #installbaseboard #baseboard #flooring #woodfloors #livingroom #fireplace #farmhouse #neutrals")
I'm obsessed with the dining room now! The flooring better matches the new new tabletop I built.
 #woodgrain #baseboards #howto #diy #tips #installbaseboard #baseboard #flooring #woodfloors #diningroom #diningtable #farmhouse")
I haven't shared pictures of the office yet because the floor is currently covered in everything that is usually in the office closet. I did a spur of the moment makeover in the closet and will share that as well as the whole office soon!
I want to thank Woodgrain for sponsoring this post. Woodgrain not only has a large selection a baseboard profiles, but they have every kind of moulding you would ever need. It has me wondering what else I can add trim to...
Most Home Depot's carry their millwork and you can check their website for more distributors in your area or order online at HomeDepot.com.
Have you tackled new flooring and/or new baseboards? Do you have any tips to add on how to install baseboard? I'd love to hear what you think!
PIN For Later:
 #baseboards #howto #diy #tips #installbaseboard #baseboard #flooring #woodfloors #tutorial #baseboardtips")


Love it! I just started to pull up padding and carpet in our basement to install new flooring. I totally agree with the baseboards! I have so many drips and random dust just sealed in under the paint! ha! We are almost done with a kitchen demo! Just in time for snow in CO! laura
I'd like to know about your flooring. Who made it and what is it called? It looks like the variegated flooring that I could use to match the flooring I have now. That company went out of business and I've been searching for something for something that would match for awhile so I could extend the flooring I have.
Of course! It is from Floor & Decor. It is a new line of flooring called Aquaguard and is water resistant. The color is Russet Oak and just a heads up that it looks way different online than in person. It is definitely warm but the photo online makes it look way more orange than in real life. The main color is the exact color of a cardboard box if that helps :)
What paint brand and color for your walls? I’m trying to find a nice white paint, but, it’s so hard to find one that doesn’t have undertones. Love yours. Can you you tell me which one you used? Will appreciate it.
Your floors and baseboards are just beautiful?
The paint is Behr and the color is Popped Corn. I love it!
Gosh, Stacy, you're amazing! Looks beautiful. Can hardly wait to see it in person. :)
Congratulations! It looks great & I know you were happy to get them done. Great choice on the flooring. It's perfect!
Wow, what a difference those new baseboards make! So glad you had some help! They really do make your rooms pop! Love it!
This is such a helpful tutorial! You make it look so easy. ?
Thanks for the great tips! We have almost finished our new flooring but still have to do the baseboards. This is super helpful :)
Hello! Thanks for the tutorial. I was wondering what size and style baseboards you chose? I really like the simple look and the height of them. Thanks!